 The first year I gardened, I quickly became overwhelmed by weeds. After a week away, it was hard to get back on top of things. I had read about the importance of mulching, but all that came to mind at the time was expensive bags of mulch at the nursery. I knew the cost would add up quickly based on the size of my garden and needing to add mulch over and over again. However, it was clear that I needed a solution. Starting the next year, and for many years since then, I have been using landscape fabric to control weeds. I lay it down along the rows, over my drip irrigation lines. I secure it with a generous amount of ground staples, rocks, and logs. Advantages of this method include:
I think this is a very decent approach to weed control and I definitely would never go back to not having any kind of mulch. However, I did find that this approach had some downsides:
Over the last couple of years, I have been experimenting with switching over my landscape fabric to natural mulch. I haven't given in to buying commercial mulch - I use whatever I can get my hands on for free. For example:
When mulching with natural materials, I make a pretty thick layer - about 4-6 inches. I keep an eye on it as it decomposes and replenish the low spots every time I mow the lawn or whenever it's needed. Weeds do pop up here and there but they are typically easy to pull. The mulch continuously decomposes, so it keeps enriching the soil. In the fall we put an extra generous layer of mulch that stays there through the winter. It keeps weeds down in the spring and I just pull off the extra when I plant, ready to be used as replenishment as needed. I still have fabric mulch in my main kitchen garden, but I don't use it in any new gardens and I am replacing it with natural mulch as it degrades. This is all part of the "no till / no dig" approach to gardening that I have been transitioning to. This biodegradable mulch composts in place and is making my soil better and better. The book that started me down this path is "Le jardin vivrier" by Marie Thévard. I also recently picked up "No-dig gardening" by Bella Linde and Lena Granefelt and "Building soil" by Elizabeth Murphy to learn more about the topic. One final tip. Years ago Ray decided to use some leftover construction paper as mulch. Not a good idea. It's waterproof so it doesn't let rain in, so you need to water a lot. And, now, 5 years into it, It's starting to fray in places and little bits of it are flaking off, I am afraid it may mix into the ground so we'll have to remove it. So be careful about using things such as this or tarps. Make sure whatever you use is biodegradable.
0 Comments
I have been working to transition to no till gardening. It is making a huge difference in terms of how early I can start gardening (since I don't have to worry about damaging wet soil with the rototiller), and the pleasantness and workload of spring. No more infernal rototiller noise, bad smell, gasoline purchasing, worrying about whether I can start to rototiller or not, flooding the carburator and all the fun stuff that goes along with small engines. When transitioning to no-till gardening, if you have a heavier, clay-based soil like mine, you will still want to "fluff" the soil in the spring (this should diminish with time as more organic matter gets added over the years). The perfect tool to do so is the broadfork. Although the broadfork is a manual tool, I find it much less of a workout to use than my rototiller. Basically, you insert insert the tip of the tines into the soil, step on the broadfork to drive them completely in, and use the two handles and your body weight to fluff the soil upwards. You don't turn the soil over - just aerate it a bit. If you do this right, you should see that the soil is sitting a couple inches higher after you do this. You repeat this down your row. Personally I really like moving the tines a few inches to the left or right after each scoop, I find that does a better job at lifting and aerating the soil. Here is a video of someone using a broadfork. Now that I have a broadfork, I will only use my rototiller to create a new garden bed from scratch, when I need to break the sod and grass. For maintenance, I will rely on my broadfork. 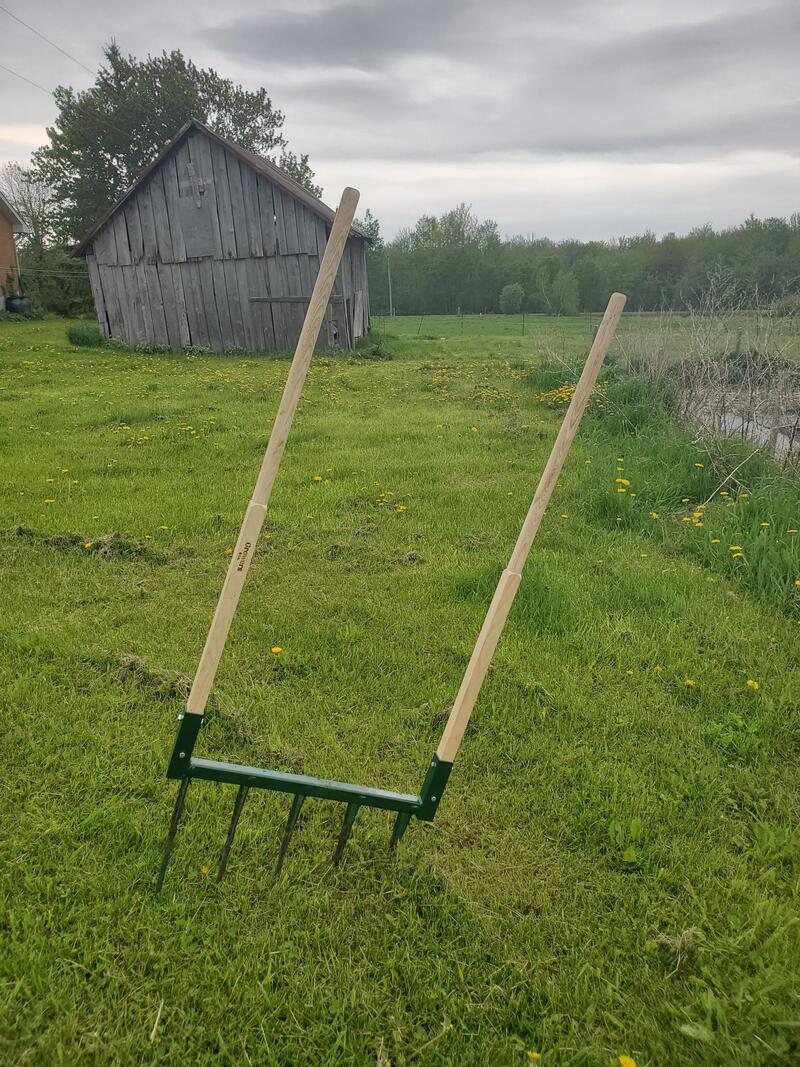 My broadfork, it comes from Growers. Choose one that is the right width compared to your garden rows. 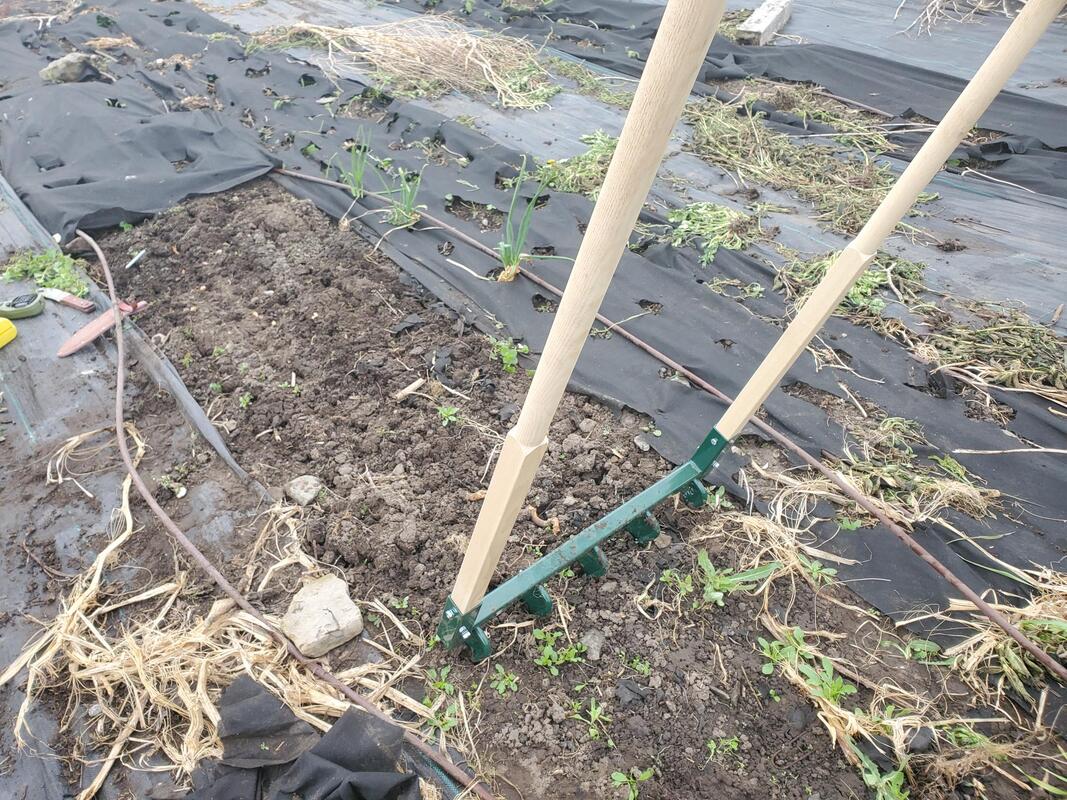 in the process of aerating one of the rows in my kitchen garden
 For me, composting is mostly a sustainable and convenient way to dispose of food scraps. Sure, it's good fertilizer but the amount of compost we generate doesn't put a dent into what we'd need to fertilize the gardens. When I need a lot of compost, our neighbor drops off a tractor bucket or composted manure, or I order some. When we first moved here, I started a compost bin outside. It was okay but a bit of a hassle to walk out and dump scraps, and we often procrastinated (especially in the wintertime) and ended up with a slimy bucket of scraps on the counter or even worse, fruit flies. Ever since I switched to vermicomposting (worm composting), those worries are over. I keep my worm bin next to the kitchen so it's easy to throw food scraps in as we go. To start vermicomposting, you need worms (you can order them online) and a worm farm or bin. There are many specialty bins available online, but, I'd rather make my own. I used two identical rubbermaid bins, one nested into the other. I drilled many, many holes in the inner bin, so that any excess liquid would drain out into the outer bin. Once my worms arrived, I put them in the inner bin along with some moistened bedding. I used coco coir (ordered at the same time as my worms) but there are many options. Once the compost is underway, I always keep about 3-6 inches of dry, shredded newspaper on top. I used to shred the paper by hand but I now use a paper shredder. This helps created a dark but airy environment for the worms, control humidity, and prevent fruit flies. The worms also gradually munch on it. Whenever I have food scraps, I lift up the shredded newspaper and add the food scraps in between the compost and the newspaper shreds. I don't have a lid on my bin. At first I did, but the lid made the bin too humid. The walls of the bins were covered in water and that made it very appealing for the worms to crawl up the sides and escape from the bin at night (they don't like light, so they don't escape during the daytime). Once outside the bin they would dry up and die. Not good! Once I stopped putting a lid on it, problem solved. The newspaper keeps it dark enough for them to be happy in the compost. There are many theories online about keeping the newspaper moist, but, I find that the lowest layer of newspaper gets moist just from absorbing moisture from the food scraps and compost. The top stays dry and the worms stay away from it. Once in a while, I throw in some eggshells grinded up in my food processor or mortar and pestle. The worms apparently need to eat this "grit" to help them grind up the food they eat. It's important not to overwhelm the bin with food scraps - the worms can only process so much. The worm population will adapt to the quantity of food you generate. However, in my case, when it's time to put up a lot of food (canning season), I have too much waste all of a sudden - in that case I put all the excess in my outdoor compost bin. But the rest of the year, the worm bin in sufficient. Every 1-2 years I harvest the compost. I have not found an easy way to do this. I used my 3D printer to print 3 sieves with holes of various sizes, that I designed to mimic the fabric screens people buy to make sieves. That allowed me to catch all the unprocessed bits of food (which I returned to the bin). But ultimately, I also need to do some hand separation of the worms and the compost. Since they run away from light, it's possible to scoop up the top layer of compost which will be worm less. By the time you put that layer into a bucket, the worms will have gone deeper and you can repeat that process. The worms need very little attention. Just topping up the shredded newspaper when it gets low. When we leave on vacation for a few weeks they don't need any special attention (don't overfeed them just before leaving - that's a recipe for fruit flies! Just give them the normal amount of food. They will keep busy processing leftover scraps and newspaper until you return. 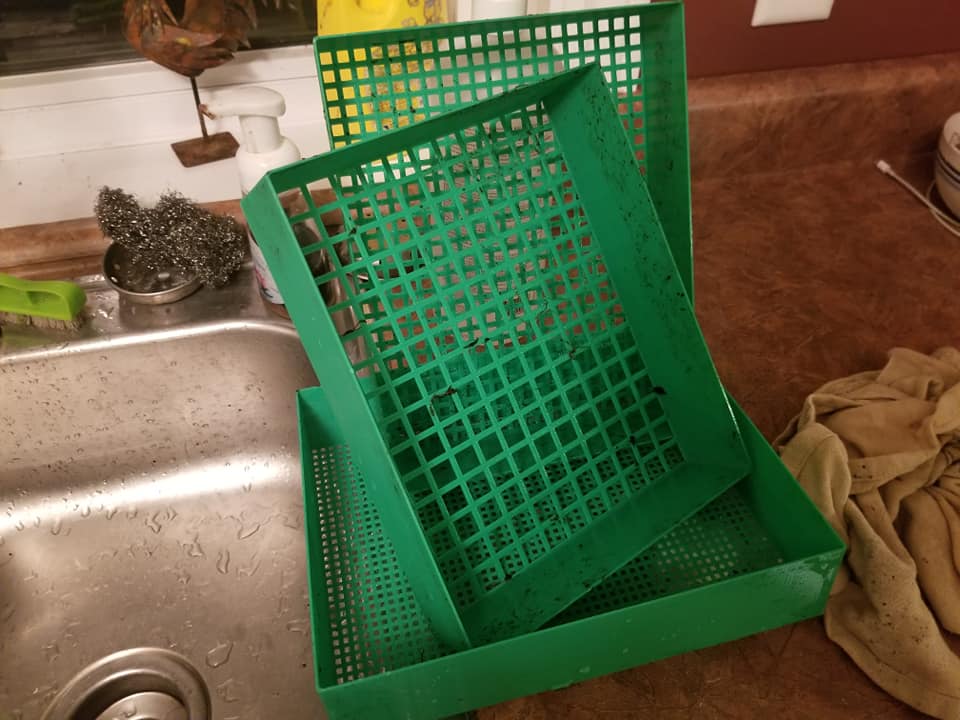 The 3D printed sieves I designed and printed |
About this blogThis is where I share my learnings and adventures in homesteading Archives
May 2024
Categories
All
|
 RSS Feed
