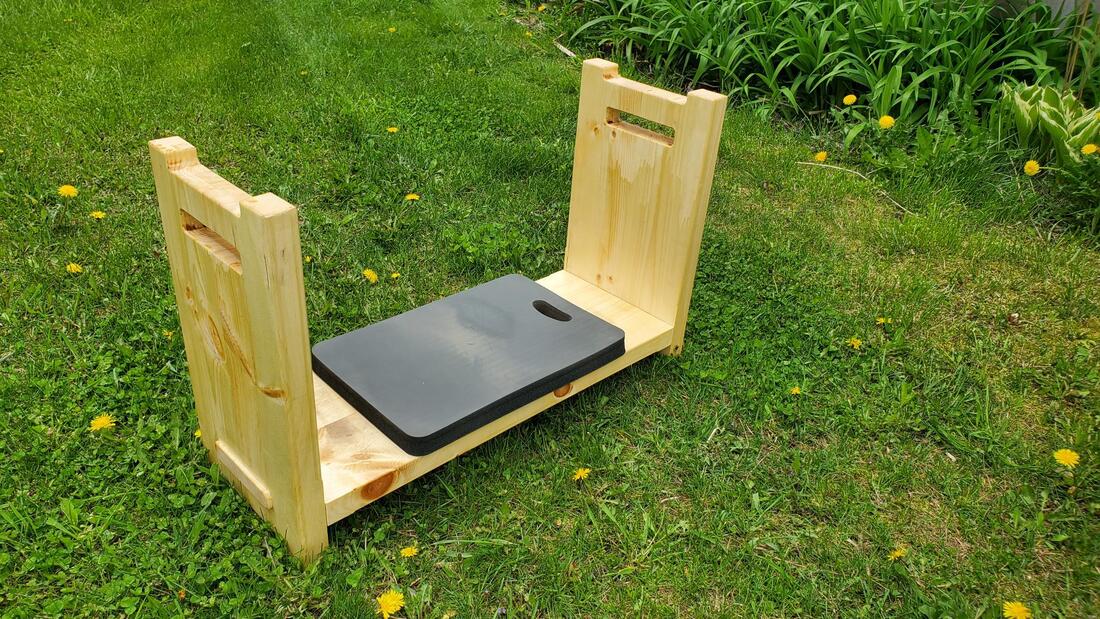
 Woodworking skills and tools come in handy in the day to day. My latest project was making a gardening bench, which is mostly used while kneeling but also for sitting. It makes it more comfortable to kneel, saves my pants from the worse of the dirt and scuffs, and makes the repetitive up and down motions easier when it comes to long days of working along rows. The design I decided on has a few bonus features as well - it makes it easier to move all my tools as I go down a row, and if I flip it upside down it's a nice stool from which I can complete the "admiration phase" of my work or take a little break. My design was inspired by commercial products such as this one. Materials needed:
To create my design, I experimented a bit with stacks of books to see what was a comfortable height for kneeling, how high I wanted the handles to be (to assist with getting up repeatedly), and how wide I wanted the kneeler (I wanted a bit of extra space on each side to put down a tool if needed). I also experimented a bit to see what dimensions would work to fold my gardening bag over the top edge. I decided to use mortice and tenon joinery for strength. I could get 2 by 12 boards so I started by jointing and laminating pairs of 2 x 6 boards cut to size. I planed and jointed them. Then I used my router to carve out a mortice and handle in each vertical piece. I made the handle and mortice symmetrical, which made for an appealing design and simple router set up. 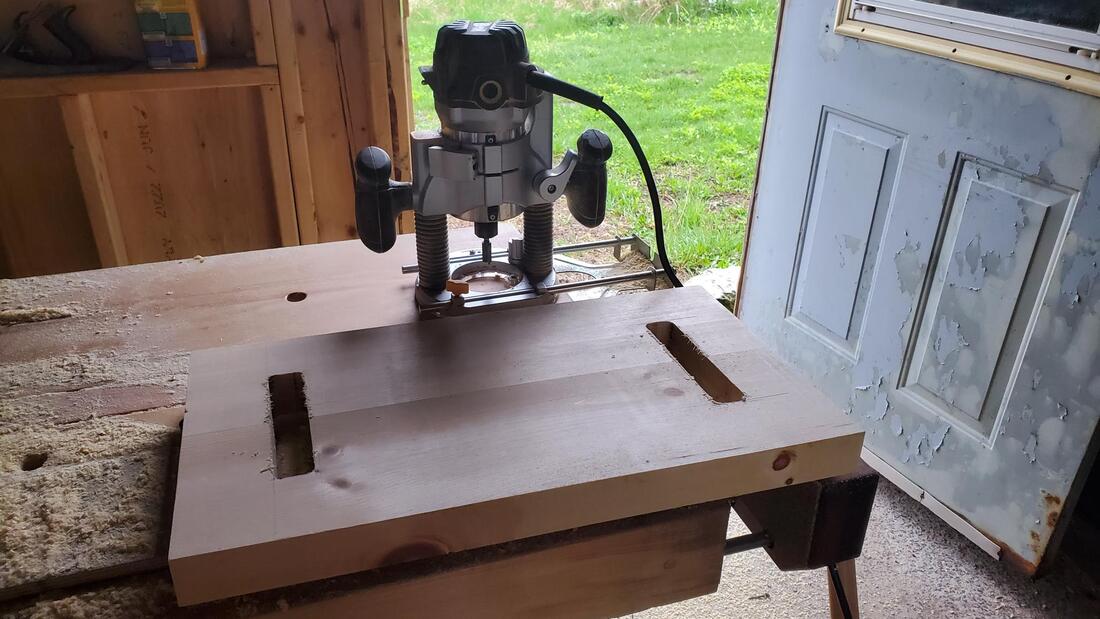 Next, I used my router table to carve out a notch at either end of the vertical board. This creates short little legs that make the bench more stable on uneven ground. As a bonus, once I started using the bench, I realized that they are great for hanging my hat or any tool with a loop. 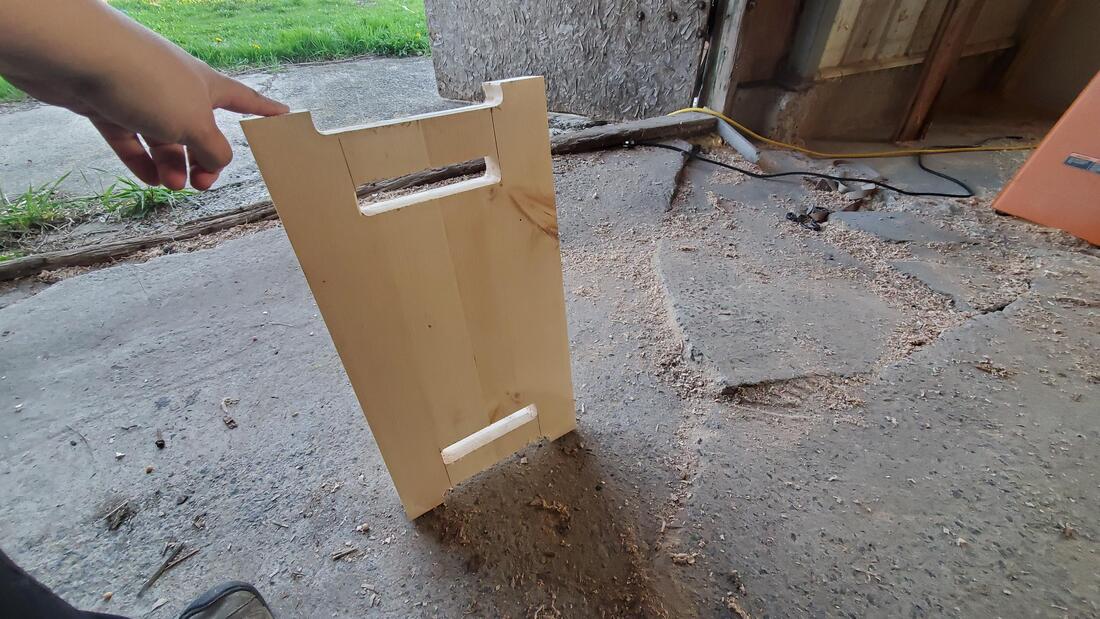 I While I was at the router table, I started to work on the tenons, at either end of the horizontal piece. I routed out material on both faces of the board, adjusting until it was the correct thickness to slip just right into the mortice. I used a handsaw on the two edges to complete the tenon, and chisels to round off the tenon and adjust the fit. I made the tenon a bit longer than needed, so it would stick out a bit, just as an aesthetic choice. 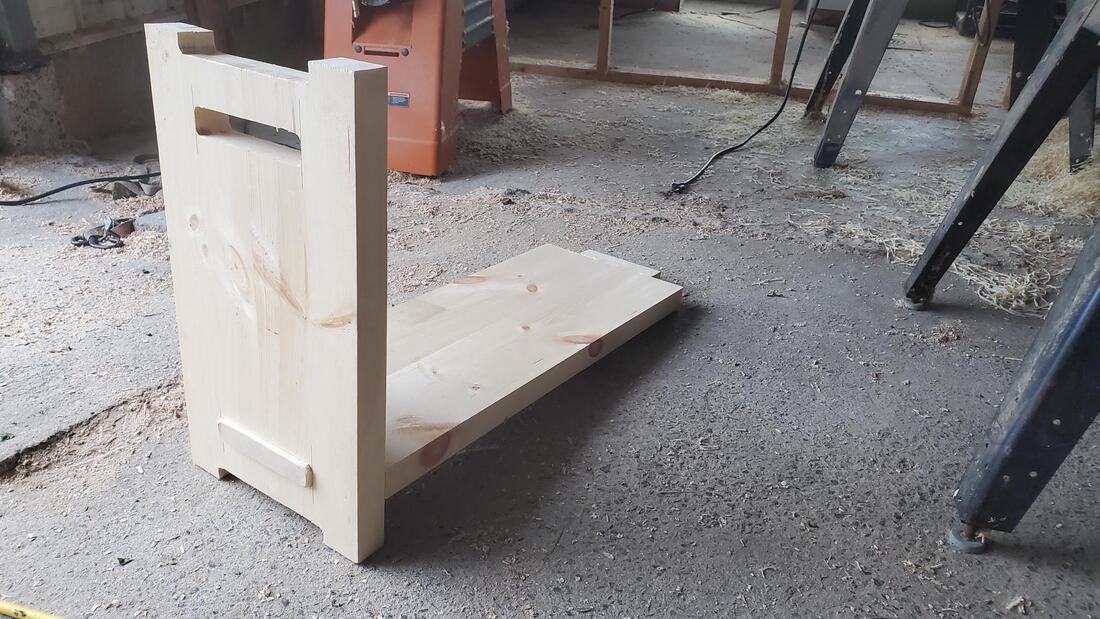 Then, I used a palm router and rasp to round the edges. I glued the mortice and tenon, and applied polyurethane finish. In the picture below, the bench is drying upside down, on some painters' pyramids that I 3D printed a while back. All that was left was gluing the foam on with contact cement. 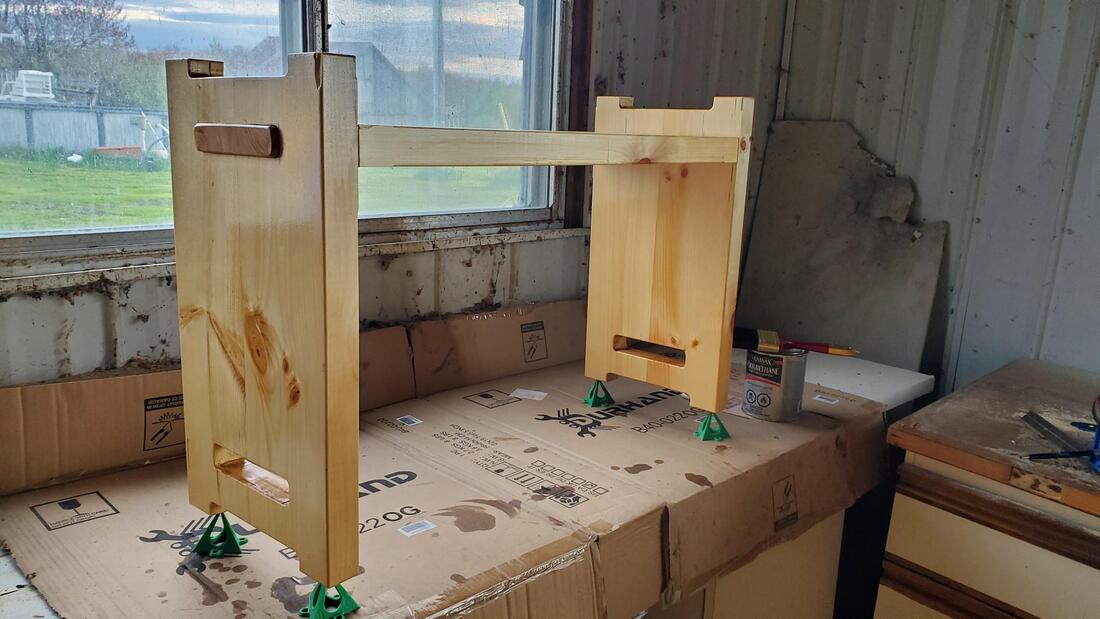 I had a chance to try out my kneeling bench yesterday while planting onions, and I love it. It is comfortable, less tiring, less muddy, and makes it easy to move all my tools along a row as I progress. The upside-down side definitely came in handy too. I love hooking my gardening bag on one end, and my hat on the other when I take it off to cool down a bit. Overall I am very happy with my design! It took about two half days to make, plus drying time. It was a lovely project to spend some time in one of my happy places, my workshop, listening to the rain falling on the tin roof.
0 Comments
 If you are like me at this time of year you might be googling things like "Christmas gifts for bakers" and "Best gifts for woodworkers", in search of inspiration. Well, let me save you some further googling in terms of the gardeners and homesteaders on your list! Here are some gift ideas they might appreciate.
If you are looking for a big ticket item, some ideas to consider would be a pressure canner, dehydrator, a worm farm, or a steam juicer (but make sure they have the space for these), or shelves and grow lights. I'm happy to help you find these things or answer questions if you are trying to surprise your favorite gardener 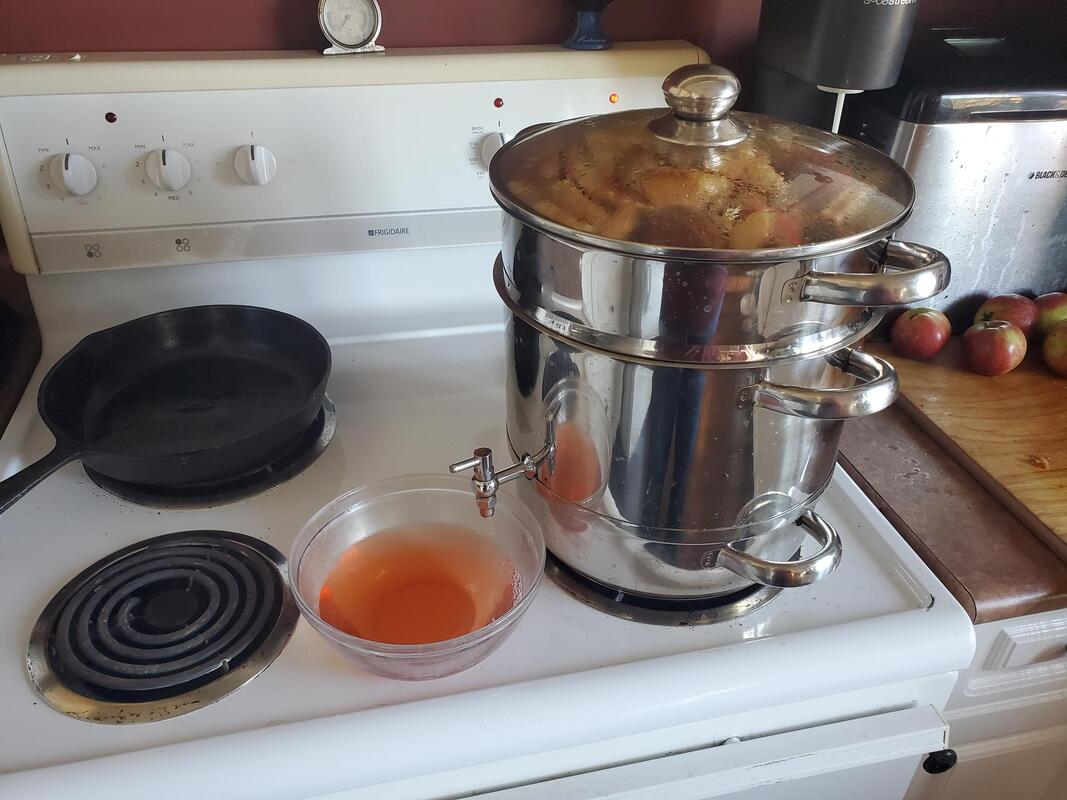 Originally I did all my juicing with an electric juicer. A couple years ago though, after our apple trees really came onto their own, my electric juicer died (the motor burned up). After doing some online research into what a more robust model might be, I realized that a steam juicer might be better suited to the homesteading lifestyle. Electric juicers seem to be better suited for making a couple glasses of juice here and there, whereas a steam juicer seems better equipped for handling large quantities of fruit. There is a third option which is a juicing press but I haven't looked into it seriously (I am not sure I want to dedicate the space to it). This is my first year using my steam juicer, and so far, so good. A steam juicer is made to run on the stovetop and it has three components:
It takes a couple of hours to extract the juice from the fruit. It's not a labour intensive process, but you do have to be around to occasionally drain off the juice and refill the bottom pan. It's most convenient to run a batch on a day where you are doing something else in the kitchen (not a problem at this time of year). So far, we made grape juice from our concord grapes, which I canned in quart jars. It is concentrated, we'll dilute it what we drink it. We also made apple juice which Ray is preparing for hard cider as I type. A steam juicer is really nice when paired up with a dehydrator. Once the juice is extracted from the fruit, you'll be left with pulp in the colander. We ran the pulp through a food mill (to purée it) and spread the purée onto dehydrator trays. This made delicious fruit leather. In my opinion, canning is a must if you are serious about growing your own food. Canning is a bit of science, and it's important to understand safe canning techniques. Many of the techniques that our ancestors used are now understood to have limitations that often lead to spoiled food and occasionally to health risks. I remember my grandmother's canned strawberries and they are a part of why I can now - but I don't follow her techniques now that we have access to more foolproof, safety tested approaches. There are three safe canning approaches - water bath canning, steam canning and pressure canning. This blog post will give an overview of each approach and will also enumerate a few techniques that aren't considered safe or foolproof anymore. Finally I'll give a few of my favorite resources for recipes. Water bath canningWater bath canning is the most traditional canning technique. It is a good one to start with because you probably already have everything needed. Water bath canning consists in bringing a very large pot of water to boil, then completely submerging the mason jars in this water for a prescribed amount of time. It is safe and effective for foods that have a high acidity (for example pickles, tomato based products with a bit of lemon juice added, jellies and jams, condiments, sweets). Pros:
Cons:
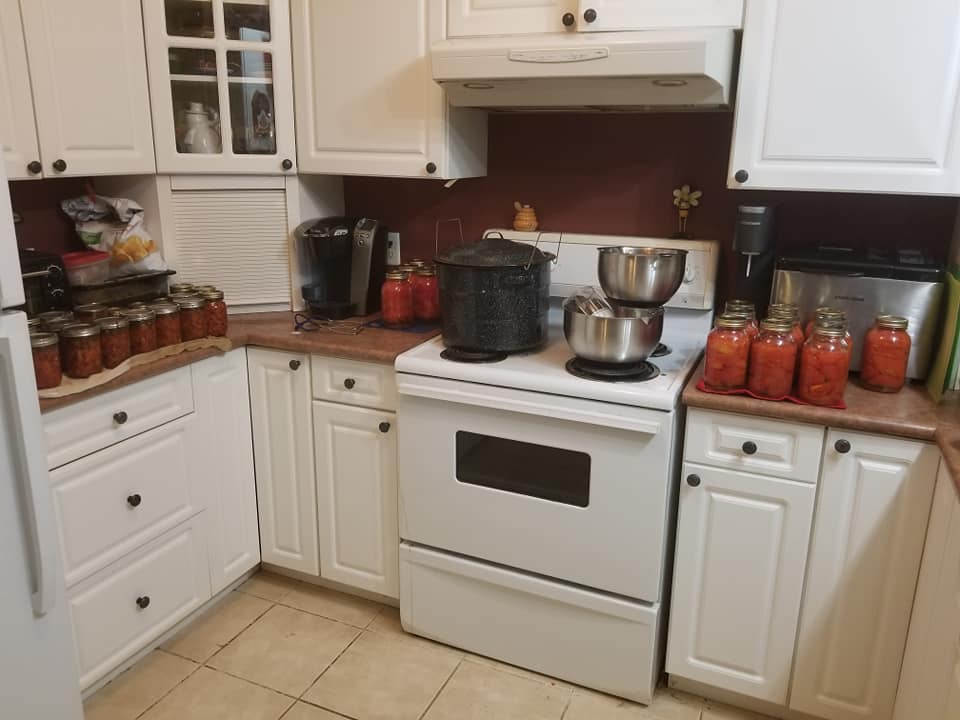 My water bath canner (on the left on the stove), the classic, inexpensive one you can get at big box stores. Any big pot will do. Steam canningSteam canning is a more recently studied type of canning. You need a special steam canner, which sometimes has a built in gauge. The canner isn't air tight. You put a small amount of water at the bottom. The jars are placed on a rack above the water. Once the pot is full of steam (and the gauge is in the proper zone), you start a timer and keep the jars in this steamy environment for the prescribed amount of time. Most water bath canning recipes can be accomplished using steam canning - the only exception is recipes with a very long sterilization time (generally quotes as more than 45 minutes), because your canner may run out of water as the steam escapes. Steam canning is an old technique but it was only recently studied scientifically and proven to be safe. Pros:
Cons:
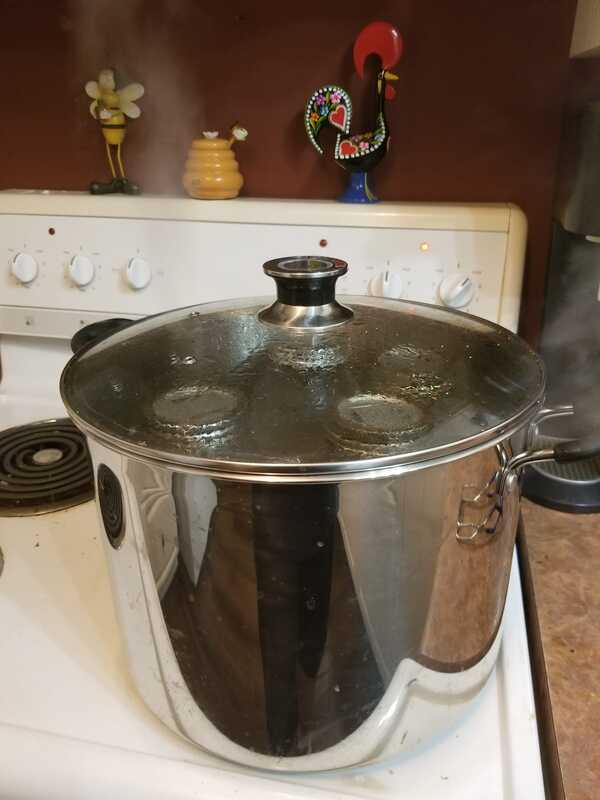 My steam canner. It's a Harvest Guard with a gauge. I appreciate having the gauge and clear lid. Pressure canningPressure canning is the only proven safe canning method for low acid foods including things like non-pickled vegetables, soups, meat, fish, broth, etc. It requires a special pressure canner. In Canada, the most readily available is the 23 quart Presto brand pressure canner. If you eat meat, it's a must - as a vegetarian, I find it very handy too. Pressure canning can be a bit intimidating for some, but, the manual is very clear so there is no reason to be intimidated. If you live in Canada, it will be hard to find a place to calibrate your pressure gauge, but you can write to Presto and they will send you a 3-piece weighted gauge that does not require calibration. Pros:
Cons:
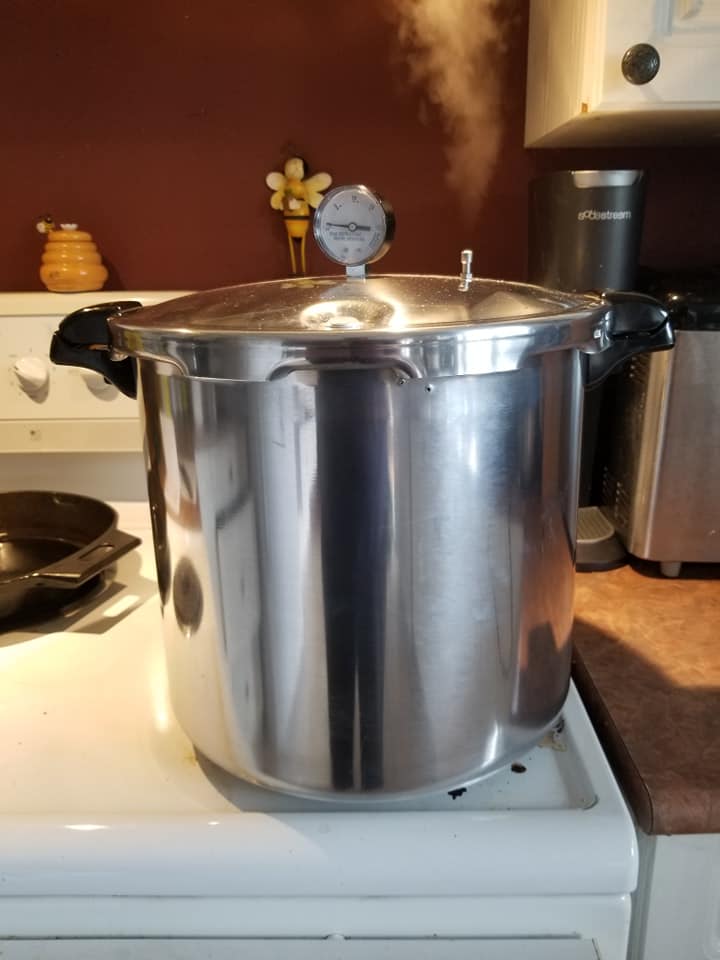 My presto 23 quart pressure canner with a weighted gauge, the best option in Canada. In the picture, the weight hasn't been put on yet (it's in the venting stage) Canning methods that haven't been proven safeMany canning methods used traditionally, internationally, or otherwise, have not been studied scientifically. Personally, I choose not to use these methods. There is a risk of adverse health effect (or even death) with all of them. Furthermore, even if you don't get sick or die, you risk your food spoiling and growing and canning food is too much work to take a chance, in my opinion. Some of the methods that you may encounter that haven't been proven safe include:
My favorite resources for safe canningI learned to can using the pick your own website. It is full of easy to follow recipes and the recipes follow safe practices.
The National Center for Home Food Preservation (US based) has very detailed and extensive recipes. Most are pretty basic and unimaginative but they cover a lot of staples. Recent canning books by Ball or Bernardin (the Canadian brand of Ball) generally adhere to safe canning practices. The Facebook group "Canning and preserving with love" has many knowledgeable admins and a considerable repertoire or safe canning recipes The website created by Vincent le canneux, in French, has safe recipes. Vincent used scientific protocols to test his recipes. The Facebook group "Conserves Maison, Cannage, hommage à Vincent le canneux", in French, has many knowledgeable admins. Tentatively I would say that Ricardo's recipes generally appear safe. Some books and resources to steer clear of include books by The Canning Diva, Miss Conserves (French), and Canning Rebels Facebook groups. These all encourage techniques that aren't proven safe. When I created my garden, I wanted to make sure that is would be okay for us to be away for occasional camping trips – so, I wanted some kind of automatic watering system. It took a few attempts, but I am finally happy with my irrigation system which consists of rain barrels, an on-demand pump, a valve on a timer, and drip emitter tubing. It was definitely a learning journey and I think it’s worth mentioning all the things that didn’t work, before I landed on my solution. What didn’t work:
What worked: The inspiration for my current system was this youtube video. Once I realized that gravity feeding wouldn’t work, I knew that I needed some kind of pump and a way to turn it on and off. I figured that I had two choices to control the flow on a schedule. Either I could use a pump that turned on and off using a timer – that solution means that you need to switch 120 volts on and off, and that you need a pump that will actively shut off the flow of water when it’s powered off. The alternative is to have an on-demand pump that is always plugged in to 120V, and a separate in-line valve that opens and shuts on a schedule. I chose the latter solution because it avoided me having to switch 120V on and off (doable with a transformer but requires some electronics work) and because I already had a programmable hose valve from a prior experiment. Either approach could work depending on what you have on hand. Here is a diagram of my overall system:  In this post, I will walk you through each of the parts of my system, from roof to garden. At the end I will give you some tips regarding sourcing the components and some lessons learned. Roof When choosing where to install your rain barrels, you’ll want a roof with the most surface area. It needs to be a roof with gutters and downspouts, of course. The more roof area feeds into the downspout(s) that you connect to your rain barrels, the better. In our case, we have a rectangular bungalow. The entire backside of the roof feeds into a single gutter and downspout; the front side is split between two downspouts because there is a peak in the roof over the front door. I connected two of the downspouts to my irrigation system (3/4 of the roof) and the third one fills stand-alone rain barrels that we use to hand water other plants (also a good backup if my irrigation system ever sprung a leak). Downspouts I cut off each downspout above the height of the rain barrels and attached a downspout diverter. I got these downspout diverters at Canadian Tire. 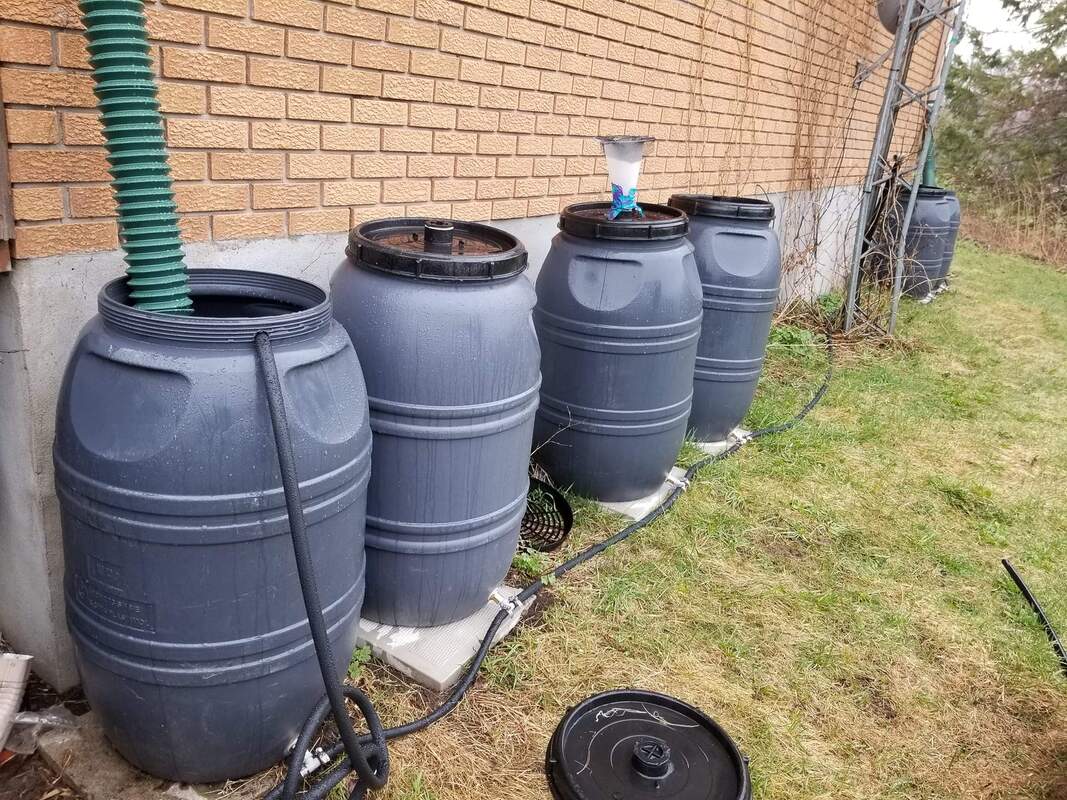 Rain barrel daisy chain We purchased plastic barrels at a flea market. They had been used for food storage – olives, peaches, etc. They are much cheaper than “official rain barrels”. I use six barrels in a daisy chain – one downspout diverter feeds into the first barrel and the other one feeds into the sixth barrel. I made a hole in each barrel close to the bottom – the lower the hole is, the better, up to a certain point. If it’s too high, you will leave a lot of unused water at the bottom of the barrel. However, you don’t want it to be completely at the bottom because the debris from the roof will settle at the bottom and could potentially clog up your system. In each hole, I put in a threaded insert and a T connector with barbed ends. I connected all the barrels in a chain using pieces from a garden hose. The first garden hose I bought was on the cheap side and didn’t work out – it was not flexible enough to slip easily onto the T connectors, and it had a raised inside seam that made it difficult to get a good seal on the connectors. I ended up buying good quality flexible garden hose from Canadian tire (sold in bulk on a spool), they cut it to whatever length you need. To slip it onto the barbed ends of the T connectors, I softened the hose a bit with a heat gun. I put a hose clamp on top of it but that is probably overkill. On the first and last barrels of the daisy chain, the T connector has a free end. On the first barrel, I used a piece of hose to connect this to the pump. On the sixth barrel, I also connected a piece of hose; can be used to drain the barrels or fill a bucket. When it’s not in use I tuck it into the top of the barrel so that no water can escape.  The pump The first rain barrel connects into the pump. The pump I chose is an on-demand pump. It is permanently plugged into a 120V outlet. On demand pumps have a diaphragm that detects a pressure differential between the inlet and outlet. If the pressure at the outlet drops, the pump turns on. In practice, what this means is that if the hose coming out of the pump is plugged shut, the pump doesn’t run; if the hose isn’t plugged up, the pump turns on. A pump like this is ideal for things like a garden hose terminated with a spray gun, or a hose with a valve on it. I can therefore control the pump by opening and closing a valve installed at the outlet. The important parameters for the pump are the flow and the pressure it creates. Those must match the parameters of the drip hose you have set up. They will depend on what hose you use and how much of it. They will be available from the manufacturer and you just need to make sure your pump and the hose are compatible. You can also think about a passive inline pressure or flow regulator if you need to. I protect the pump from the elements by putting it in a plastic “bowl” that is then covered by an overturned Rubbermaid bin. A bungee cord and two tent pegs hold this down. I ordered my pump from amazon. 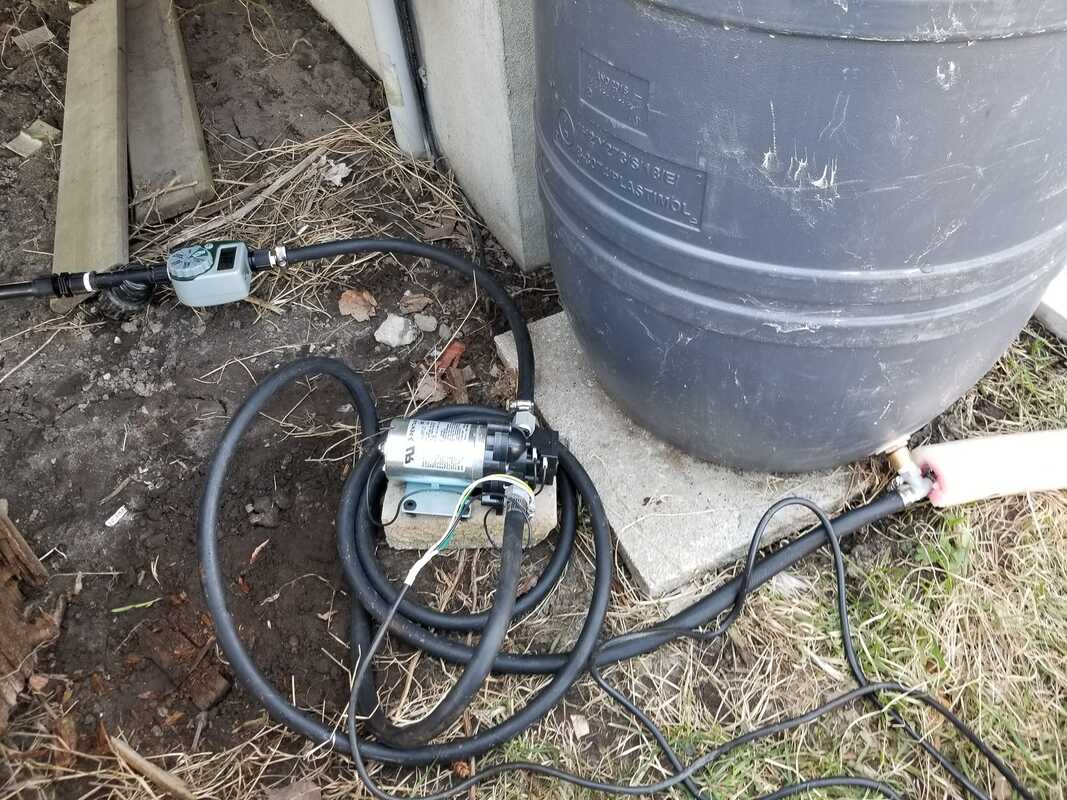 Water level detector For extra peace of mind, I added a floating water level detector (similar to what you would use for a sump pump). If the water level drops too much, it cuts off electricity to the pump. This way, the pump will never run dry. I chose a detector where the float moves up and down on a stick, rather than one that flip flops like most sump pump floats, to make sure it wasn’t impeded by the barrel walls. The valve I used a programmable garden hose timer valve that I had bought for a previous experiment. It is powered by a 9V battery. When we leave for a few days, I set it to run for 30 minutes every 2 days (I am still figuring out the best schedule but that is what it is for now). I usually program it to run in the evening so the water doesn’t evaporate before it soaks into the ground. 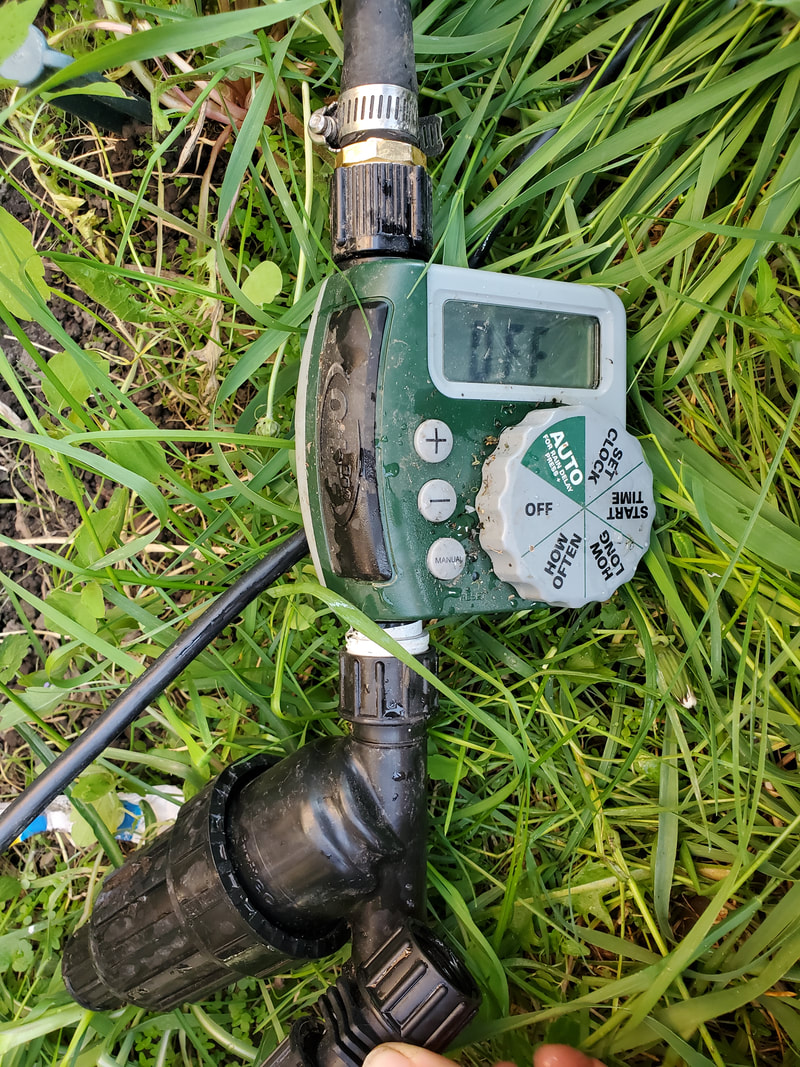 The filter I have an inline filter right after the valve (the black device pictured above is the filter). I bought it with the rest of my irrigation line, from Irrigation direct which is a Canadian supplier. This helps catch any small debris so that it doesn’t clog up my lines. The main line The main line runs from the filter to the garden. It’s a polypropylene line from Irrigation direct. We have had many mishaps over the years involving the grass mower and hoses, so I buried the line underground. I use my rototiller to dig a trench, buried the line , and filled the trench back up roughly. Within a few months the grass had grown back. The line runs all the way down to my garden and the across the top of each row. The drip emitter lines Each garden row has one or two drip irrigation lines running down of it, depending on the spacing of the plants in that row. These irrigation lines are hooked up to the main line using a self-tapping T connector (very convenient). Each line also has a manual shut off valve so that I can turn certain rows on or off when only some rows need to be watered (for example if I only planted the old crops in the spring). Each row is terminated with a figure 8 stopper which basically folds the line onto itself. The drip lines aren’t anchored to the ground with ground staples, so I can easily move them out of the way when I fluff the earth in the spring, and I can easily adjust them around the plants. They mostly run under the mulch. 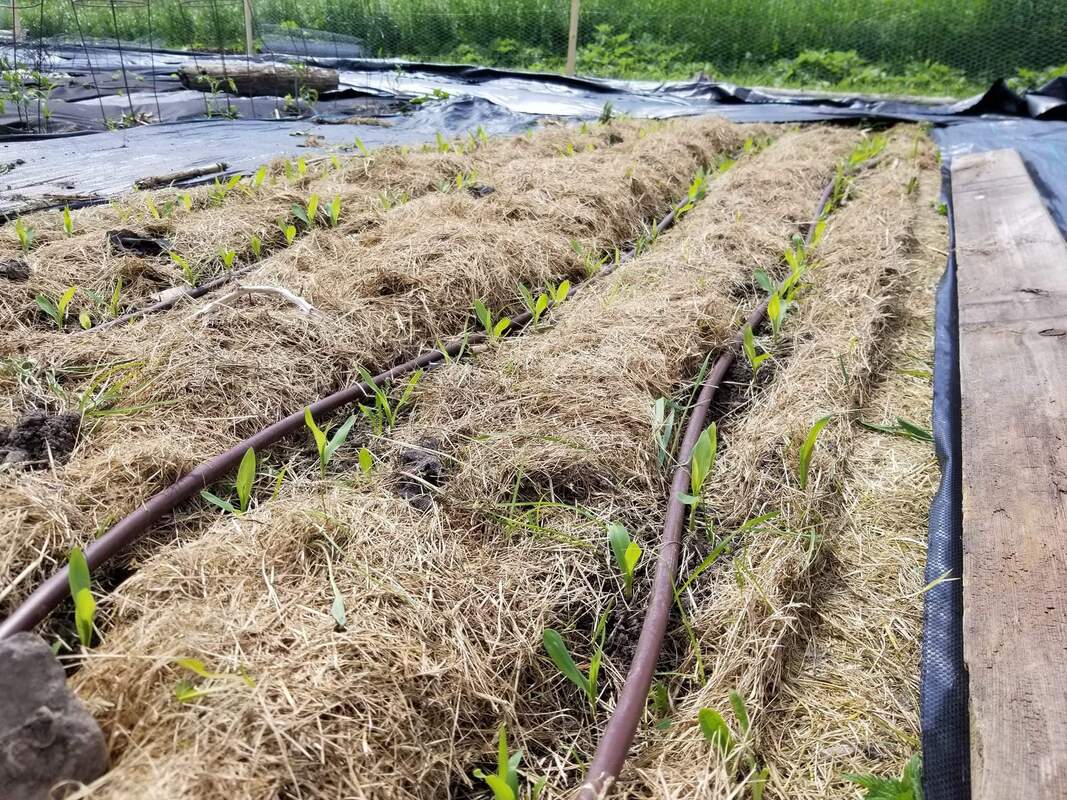 Sourcing this equipment
I ordered all my irrigation-specific supplies (drip lines, polypropylene tube, connectors, filter, manual shut off valves) from Irrigation direct, which is a Canadian supplier. They have tutorials and lots of example setups on their website, which were very helpful to me when planning my setup. The more generic stuff (pump, garden hose, garden hose timer, downspout diverters, threaded inserts and connectors) are available on Amazon or at big box stores such as Canadian Tire and Home Depot – I shopped around for price and compatibility. The rain barrels are food grade barrels from a flea market. A note about hose connectors Figuring out the connectors to make all the different elements hook up to each other was a bit of a pain. Understanding existing threaded pipe standards was important in order to figure out what would screw into what and what kind of adapters I needed to get.
Winterizing To overwinter my system, I bring in the pump and garden timer before temperatures drop below freezing. For simplicity, I just cut off a few inches of hose on either side of the pump to disconnect it from the system, and in the spring, I took off that small bit of hose and used a heat gun to slip the barbed connectors inside the remaining hose. I empty the barrels and lay them down on their side (so that no water freezes inside the hoses or threaded inserts). They moved around a bit more than I would have liked due to wind, so next year I will probably stake them down using a rope and tent pegs. I didn’t bother blowing out the hoses – I figured they would empty themselves well enough through gravity. When I hooked everything back up in the spring, everything worked well right away. It’s a good idea to reinstall the rain barrels early in the spring, to fill them up with those spring showers. I installed them in early April. However, I only reinstalled the pump and timer in late May once I had planted my garden. Possible improvements I did get a bit of a hiccup when debris got sucked in from the bottom of the barrels and clogged up the timer, so I might look at some kind of pre-filtering provision. I could also consider adding a rain detector to avoid watering the garden when it has rained that day or the preceding day – I don’t worry about that since if it’s raining, the rain barrels are refilling anyways. Some garden hose timers come with this rain detector capability built in. I also think it would be nice to add a second line in between the pump and the timer, and hook it up to a garden hose with a spray gun, for occasional hand watering (right now, when I need to hand water, I just dip a watering can in the barrels). Finally, although I had plenty of water last summer and never emptied out my barrels completely, I will be monitoring to see if that is the case every summer. If I do bottom out, I could consider adding more barrels to my system to have a larger reserve. Spring showers filled up 6 barrels in no time and I am sure they would fill up many more. Concluding thoughts The irrigation system gives me peace of mind when we are going away, and it’s proven to be robust – I haven’t had any issues with leaks. It did not totally replace hand watering in the spring - I did find that I did some spot watering at the beginning of the season to get seeds germinating when not the entire garden was planted. I also find that since I use mulch everywhere, the watering needs of my garden are not that high. Even after several days of no rain and hot weather, if I put my hand in the soil under the mulch, I am surprised at how damp it is. So, I don’t run the irrigation system as much as I thought I would. It is useful when we are away for 3 days or more, but I don’t run it often if we are at home. If we didn’t travel and camp in the summer I would say an irrigation system may not be worth it, but I am glad I have it so that I don’t have to worry about the garden when we are away. I have been working to transition to no till gardening. It is making a huge difference in terms of how early I can start gardening (since I don't have to worry about damaging wet soil with the rototiller), and the pleasantness and workload of spring. No more infernal rototiller noise, bad smell, gasoline purchasing, worrying about whether I can start to rototiller or not, flooding the carburator and all the fun stuff that goes along with small engines. When transitioning to no-till gardening, if you have a heavier, clay-based soil like mine, you will still want to "fluff" the soil in the spring (this should diminish with time as more organic matter gets added over the years). The perfect tool to do so is the broadfork. Although the broadfork is a manual tool, I find it much less of a workout to use than my rototiller. Basically, you insert insert the tip of the tines into the soil, step on the broadfork to drive them completely in, and use the two handles and your body weight to fluff the soil upwards. You don't turn the soil over - just aerate it a bit. If you do this right, you should see that the soil is sitting a couple inches higher after you do this. You repeat this down your row. Personally I really like moving the tines a few inches to the left or right after each scoop, I find that does a better job at lifting and aerating the soil. Here is a video of someone using a broadfork. Now that I have a broadfork, I will only use my rototiller to create a new garden bed from scratch, when I need to break the sod and grass. For maintenance, I will rely on my broadfork. 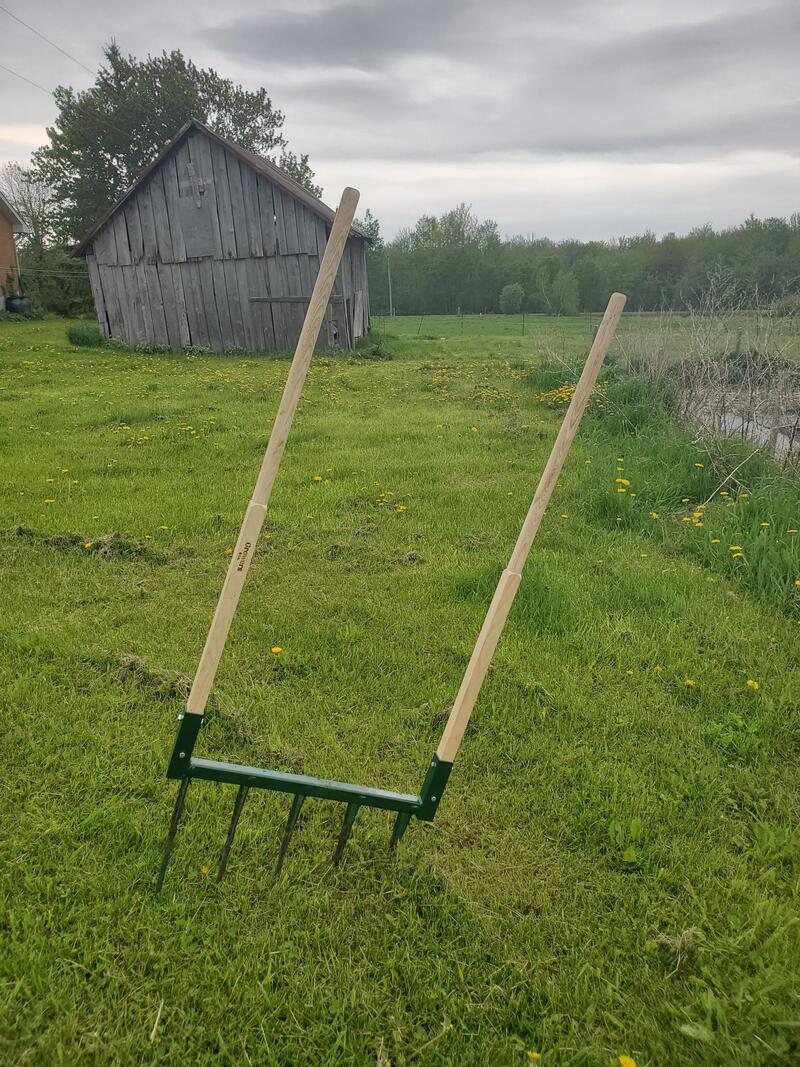 My broadfork, it comes from Growers. Choose one that is the right width compared to your garden rows. 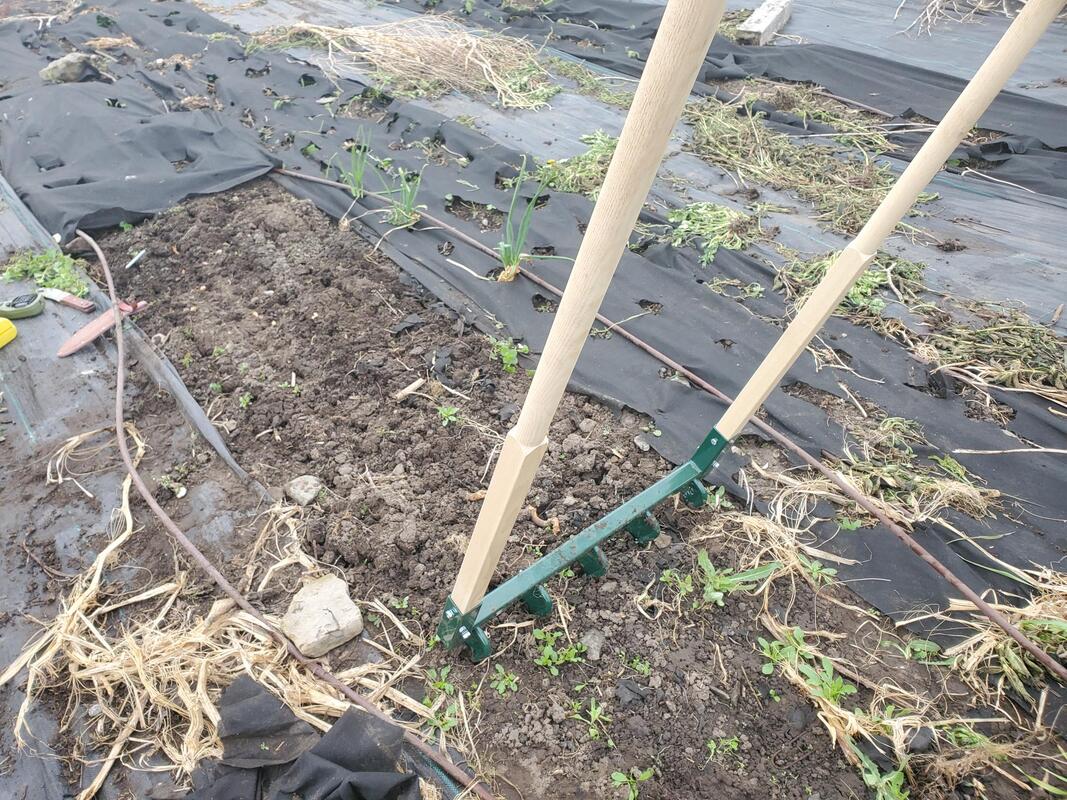 in the process of aerating one of the rows in my kitchen garden
|
About this blogThis is where I share my learnings and adventures in homesteading Archives
May 2024
Categories
All
|


 RSS Feed
