|
Over the years I have worked to establish more perennial food plants on our property. They typically cost a little more upfront but having low-maintenance, recurring sources of food is great. In the process of writing this post, I realized we have over forty different perennial foods growing on our property - a mix of naturally occurring and purposefully introduced.
I have integrated these perennials plants in various places on the property, creating a bit of an edible landscape; but I also have a few dedicated perennial beds in a section of our property. I keep these beds separate from my main garden so that they don't interfere with crop rotation. Before I switched to a no-till approach, it was a also a concern that they would get in the way of rototilling. I'll provide a summary of the perennial foods we grow, in hopes that it will give you ideas if you live in a similar zone. Even though we live in zone 5, I tend to favor perennials that are rustic to zone 3, to ensure they are very rustic and survive our winters. Trees:
Berries and other small fruits:
Edible flowers:
Herbs:
Others:
Naturally occurring perennials (foraging - more details here)
Failures - things I might try again:
0 Comments
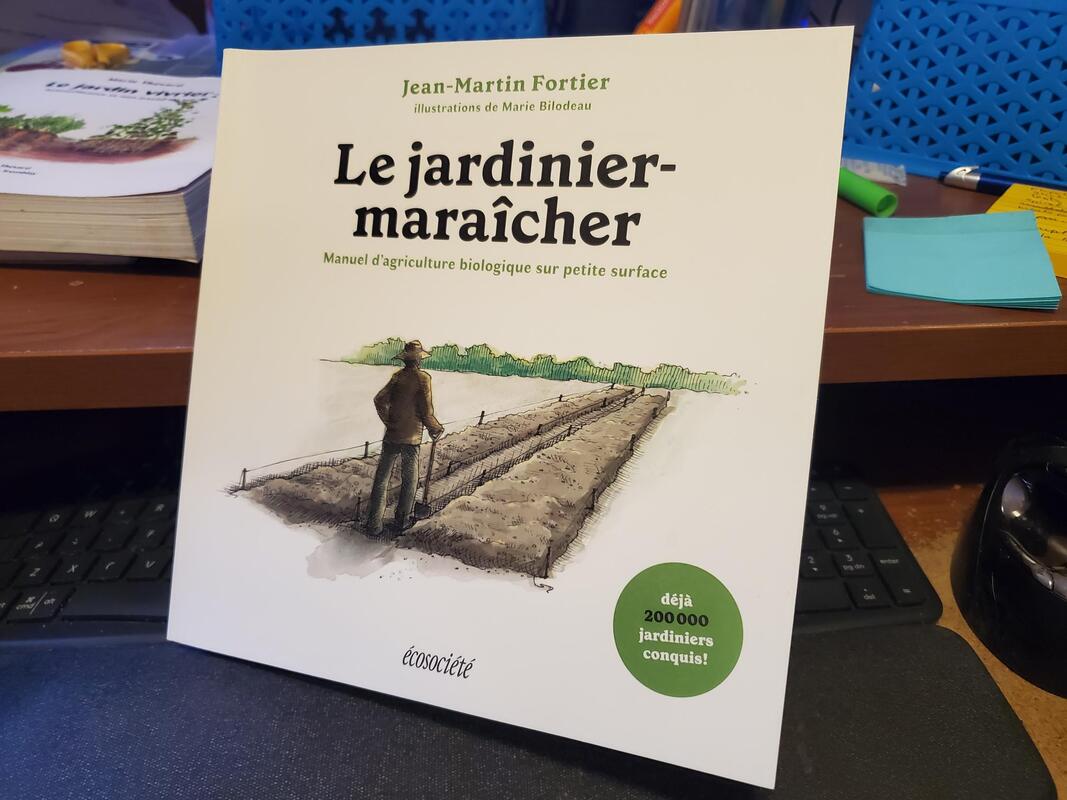 Le jardinier-maraîcher: Manuel d’agriculture biologique sur petite surface, Jean-Martin Fortier
The market gardener : A successful grower’s handbook for small-scale organic farming, Jean-Marc Fortier This very practical handbook is based on the experience of Jean-Martin Fortier and Maude-Hélène Desroches in establishing a successful small scale organic farm serving customers mostly through a CSA basket program, in the Eastern Townships of Québec. Their approach is centered on organic methods, intense planting, and efficiency of work, enabling them to minimize how much they invest in equipment and people power. Given these goals, a lot (but not all) of their conclusions are very applicable to a homesteading garden, where minimizing work and investment are typically very important. Where the applicability breaks down is where they make decisions based on building their customer base, and also, because minimal attention is paid to planning a garden with the goal of preserving food over winter, as their business revolves around selling fresh produce. I really enjoyed the way the book is organized – it is a true handbook, with chapters on every phase of setting up and operating a large garden. The first few chapters would be useful for someone who is still dreaming about homesteading. They cover how to chose the ideal property and how to set up your site. If you already have a property, you will probably only skim them. The rest of the chapters are dedicated to one topic each, including fertilizing, indoor seedlings, direct sowing, weeding, pests, prolonging the growing season, harvesting and planning your production. Personally, I also enjoyed how throughout the book, the author shares the philosophy behind their approach. The themes of sustainability, anti-consumerism and seeking a balanced life resonated strongly with me. These themes don’t take over the book, but they do incite reflection and give an intention to the work. There are many reference charts and appendices covering things such as rotation charts, crop spacing, planting calendars, solutions to common problems, etc. There is also considerable attention given to the business side of things, which I found interesting but not very applicable to my situation, where my goal is feeding myself and my family, as opposed to growing a business. After my first reading of the book, I have a few take-aways that I am immediately putting into practice:
Those are my immediately actionable items. The book also gave me some longer-term ideas. I would like to look into simple-ish ways to extend the growing season, such as floating covers, row tunnels, and maybe a small greenhouse. I am also curious to do some more scientific soil tests and to look into a more test-based approach to fertilizing my soil. There were also some aspects to the book which were not really applicable to my situation, and I feel that they may not appeal to most homesteaders. The approach explained in the book is not a no-till approach – some light hand-operated machinery is used. It makes sense from a business perspective but on the kitchen garden scale, I prefer the simplicity, and lower investment, of a no till method. Some of the equipment, although much more affordable than typical farming machinery, is still a bit pricy if you aren’t planning to recoup your investment through sales. Similarly, the farm relies on manmade mulches, and some options are interesting, such as a cornstarch based biodegradable membrane that is incorporated in the soil in the fall. However, in my case I will stick to natural mulches such as leaves and grass cuttings, which I can get for free and which contribute to improving the quality of my clay-based soil. In conclusion, I would highly recommend this book to anyone with a large garden, especially if they are based in zones 3-5. I would rank it as my second favorite book, after “Le Jardin Vivrier” by Marie Thévard – the reason I prefer the latter is because the scenario described in the latter is more similar to my own – a self-sufficiency goal, rather than a small business goal. Together, these two books make a powerful duo for people in a homesteading situation. 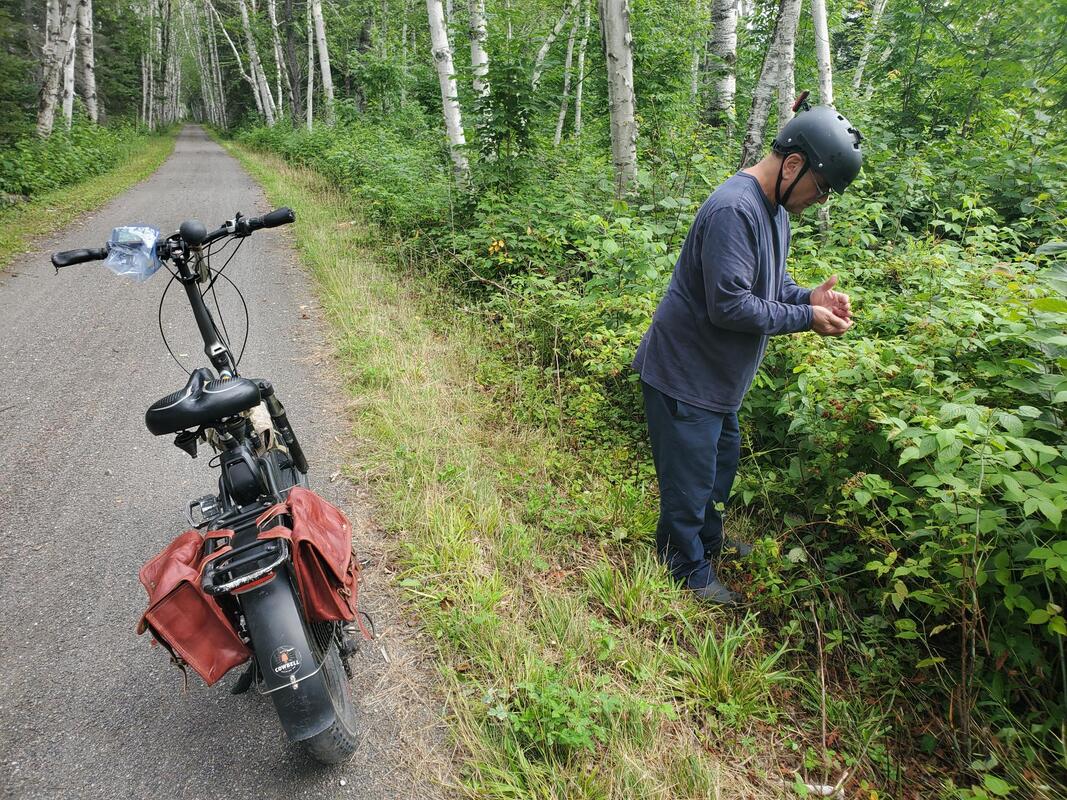 Stopping for wild raspberries on a bicycle trail There is something to be said for finding free snacks wherever you go. In addition to growing my own food, I also enjoy foraging. The following quote from "Landmade - Eating the wild things" also speaks to me: "In a society that encourages - even insists on - constant consumption and consumerism, foraging your own food for free can be an act of rebellion". I think that most of us have had experiences with foraging, be it as simple as eating a few wild raspberries or strawberries in the summertime. I remember my grandmother showing me where to pick raspberries behind my grandparents' cottage when I was a child. I brought a tiny bucket back and had them over vanilla ice cream with a bit of maple syrup. So sweet! I also remember visiting our current property with the previous owner, just before moving in. He gave us a tour or the forest, the marsh, the fields and pointed out the raspberry bushes and the sugar maple in the forest, and I felt so lucky to become the custodian of this land. I have found it challenging to learn foraging from books or website, however, spending a couple hours with a local forager keen to share their knowledge was an incredible learning experience. In our case, we leveled up our knowledge with a foraging walk with the kind people of Landmade, at a location about half an hour from our property. I would not hesitate to recommend their walks and workshops. After our walk with Jess, our guide, we started to notice wild foods everywhere we went - on the side of the highway, in parks, and on our property. Our eyes were opened! Here is a little gallery of some of the foods we forage on our property. These image are just meant to encourage you to get to know the land around you, and to pique your interest - please make sure you are certain of your identification before eating anything you forage. If you grow a larger amount of food and are striving towards self-sufficiency, having a good tracking and planning system is essential. You want to get a strong sense of how much of each product you use each year, and how much you need to plant in order to produce that quantity. Over the years I have improved my tracking and planning processes. In this post, I will share what a year-long cycle looks like. The central piece to my system is the inventory list posted on my fridge. Every preserved product is listed on it. It is organized in sections: side dishes (pickles, salsa and other), main meals (pasta sauces, vegetables), sweets (jam, fruits and other), drinks, and miscellaneous (including honey and maple syrup). Each item has spaces to keep up-to-date numbers of the remaining portions of each "format" of that item written in pencil (quart, pint, half pint, frozen portion, or other unit that makes sense for that type of food). Every time we open a jar or package, we erase and update the remaining numbers (I keep a pencil with a magnet taped to it on the fridge). Each product also has a space on the right where I recorded how many of that item we had going into the preceding fall. If we run out of something, I make a note of the date by which we ran out, so that I can estimate the shortfall. If something goes bad, I make a note of that date as well so that I can plan to use all of that product by that date the next year. The inventory list is my starting point for meal planning throughout the year. By having our starting and current numbers on my list, I have a sense of what we'll run out early and what we have a lot of. I plan my meals based on that. We mark off what we use on the inventory list as we go. 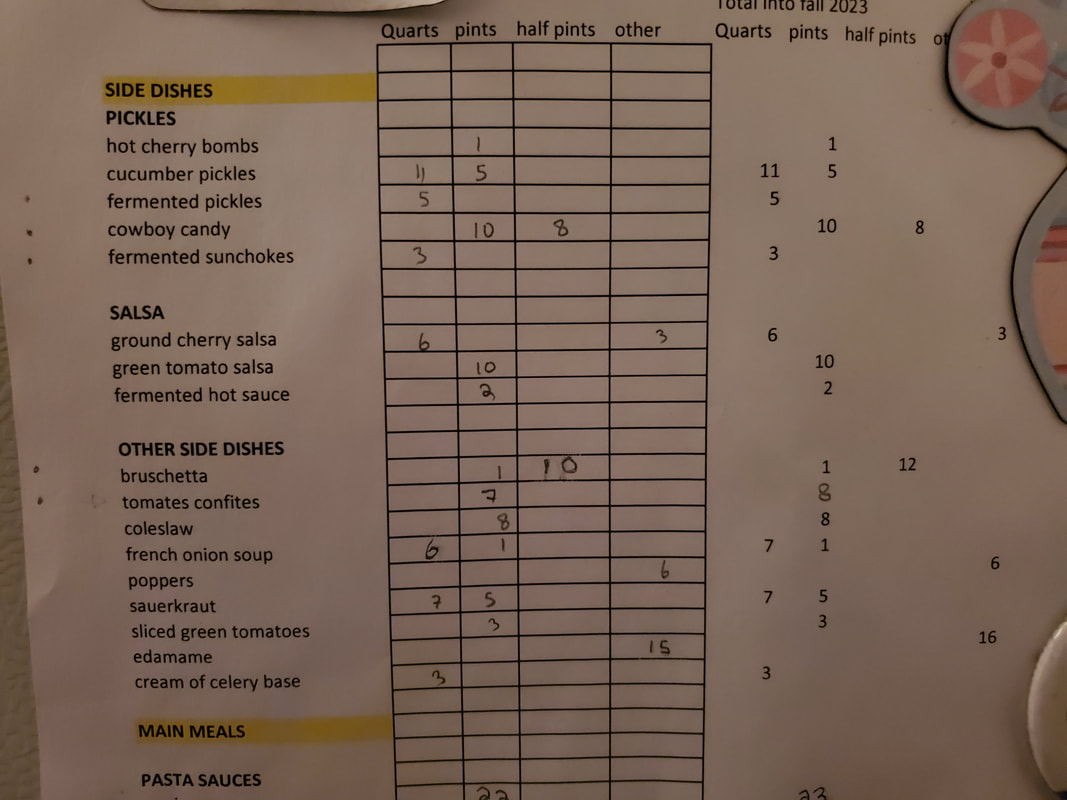 Let me walk you through what a one year cycle of tracking and planning looks like. Early August - annual inventory and estimate of annual usage At this time of year we are eating mostly fresh from the garden so my inventory won't fluctuate too much going into the fall. Just before canning season starts, I do a full inventory of the cellar, shelves and freezer, and I record of what I still have in stock from the previous year. It is a chance to correct for any instances where we forgot to update the inventory as we used products. I make a permanent record of this number in an excel sheet (see below). I compare this with the number I noted a year ago on this date, , and I calculate our yearly consumption: Annual consumption = (how many I had in early August last year) + (last year's production) - (how many are left) I sometimes adjust that number up or down based on whether I felt like we would have enjoyed more if we had more, or had to make an effort to incorporate that much in our meal planning. I then calculate how many of that product I want to preserve. Production goal = (Annual consumption) - (how many are left) + a bit of buffer Lately I have been thinking more about crop failures or how some summers, one crop will do very poorly. For example, last year all my cucumber plants were eaten by groundhogs before I fenced in the garden; this year, abundant rain led to poor tomato production; a few years ago an ill-timed frost killed all our apple blossoms. For this reason, for the most important products, I try to have two years' worth of stock, instead of one year's. 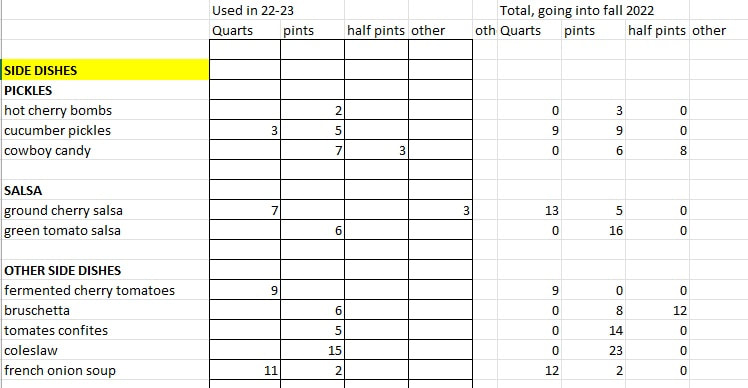 Early August - preserving plan At this point I'm just about to enter preserving season. I have a pretty good idea of how each crop is doing, and I know what my production goals for each product I want to preserve. Realistically, I won't be able to reach all those goals, so it's time to make priorities. At this point, I make a list organized by fruit/vegetable, listed from earliest to mature to latest to mature. For each item, I decide on my priorities and goals. For example, for tomatoes my first priority is to make sure we have a year's supply of canned whole tomatoes; my second priority is marinara sauce; any extra tomatoes after that can become tomato juice, bruschetta, bbq sauce etc. Each item has my production goal next to it. That list gets posted on my fridge and it becomes my to-do list. 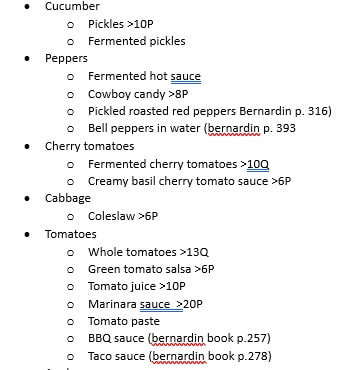 August-November - harvesting, preserving and seed saving During this period I do most of my preserving. Each week I look at what is next based on my preserving plan, and that helps me get organized in advance for my next task (making sure I have the correct spices, enough vinegar, that I have the right size jars etc). I record my completed batches on this sheet in pencil, and cross off items as I meet my production goals. If I exceed all my production goals for an item, I call up the local food bank and they pick up the extra produce. On the tail end of the harvest, I print out a new inventory list for the fridge. It has my new starting numbers (how many of each thing I have in stock, recorded permanently on the right side) and penciled-in current numbers on the left. At the point these are the same number, of course, but the penciled-in numbers will soon get erased an updated. During harvest season, I also engage in seed saving. I'll write a separate blog post about seed saving at some point but I mention it because it will come into play in the next step.  Early December - rough garden plan and seed order In late November/early December I get my seed order organized. I recap the year and decide what I won't try again next year and a few new things I would like to try. I also organize my saved seeds. At this point I make a rough plan in terms of how many of each item I want to plant in my garden next year. For example, if I had planted 20 tomato plants, but reached only half of my production goals for tomato-based products, I should consider having 40 tomato plants next year. After many years of experience, I can adjust that number a bit based on experience and whether I think this year was an outlier in terms of weather and pests, but it gives a great starting point. At this point it's okay to have just a rough plan. I just need to know how many seed packets to order. For each plant, I decide if I should start it from seed or purchase seedlings in the nursery. Usually, if I want just a small number of a certain plant, I will get it at the nursery (for example, most annual herbs, or cherry tomatoes because I prefer getting single plants of a few different varieties). Anything that I grow in quantity, I start from seed. I look at what seeds I have in stock. These could be leftovers from last year, or new seeds I saved from this harvest. I make an excel sheet with all the plants I am planning for, and for each one, I capture whether it will come from leftover seeds, saved seeds, purchased seeds, or be bought as a plant at the nursery. I shop around and place my seed orders based on this information. I also might also order a few plants online that are harder to find locally. 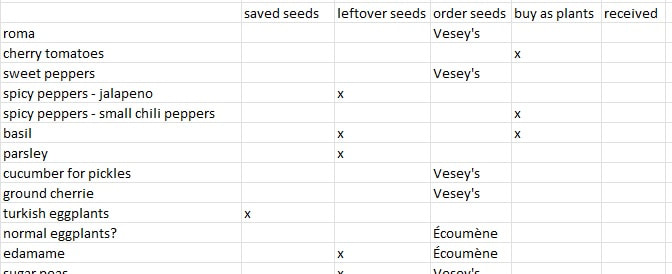 January- seedling planning By January I want to have a firmer plan. I use excel to make an aerial plan of my garden and plan out specifically how many of each plant I will have in the garden, and how much space that adds up to. I take into account crop rotation and the varying conditions in each part of the garden (soil type, wind exposure, irrigation lines, sun exposure...). Once I have that plan, I know how many seedlings I will want for the garden. 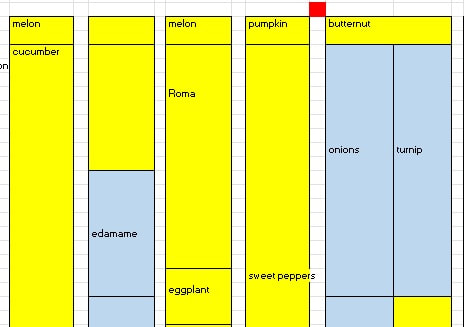 April-May starting seedlings Each year, in my garden notebook, I record how many seedlings of each type I start each year, and how many I transplant successfully in the garden. This way I know what percentage of extra seedlings I should start. This all needs to be balanced against the total amount of seedlings I can nurture given shelf space and lighting. For any tracking that happens in my seedling work area or in the garden, it works best for me to record things in my notebook, as opposed to on the computer.  May-June planting outdoors
In the process of transplanting to the garden, some changes will happen for sure. Some seedlings might have been less or more numerous than my plan, and I might get tempted by something extra at the nursery or pick up some unexpected seeds at a seed swap. I keep records of everything to help me plan next year. If any seedlings failed, at this point I decide whether it is worth getting replacement plants at the nursery. Conclusion This brings us to a full one year cycle. It took me a long time to refine my tracking system and I hope this information and the samples I provided will be useful for some of you. "How many tomato plants should I plant?" is such a common question online, but I've learned that the only person who can truly answer it is you, after careful tracking over the course of a year! 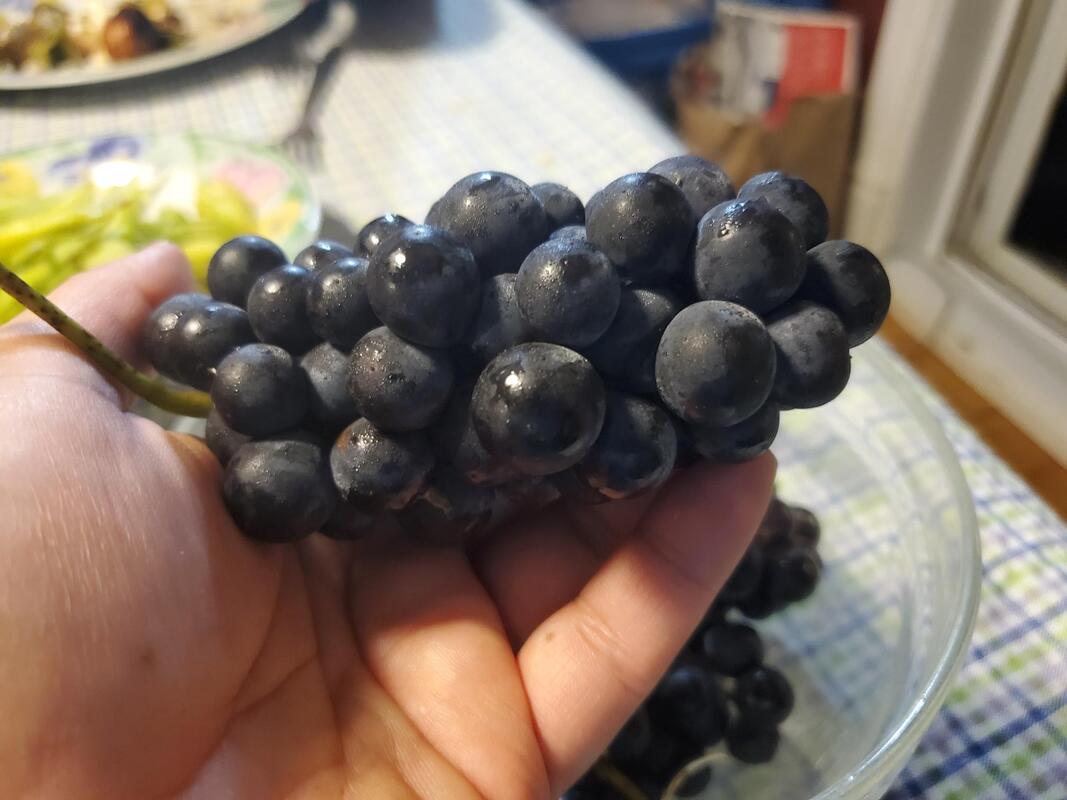 Some days when I'm feeling more philosophical, I think about how bigger sustainability concepts connect to our little homestead. For example, the circular economy is a big concept in sustainability. A circular economy is a production and consumption model within which all things are reused, recycled, repurposed as much as possible. Here are a bunch of real life case studies of circular economy. Closer to home, I couldn't help but think that our recent grape harvest was like a little model of a circular economy. When we harvested grapes this year, we made very good use of everything we harvested... anything that was a byproduct of an operation became something else that was useful. Nothing went into the garbage. Here's a little diagram of how it played out. 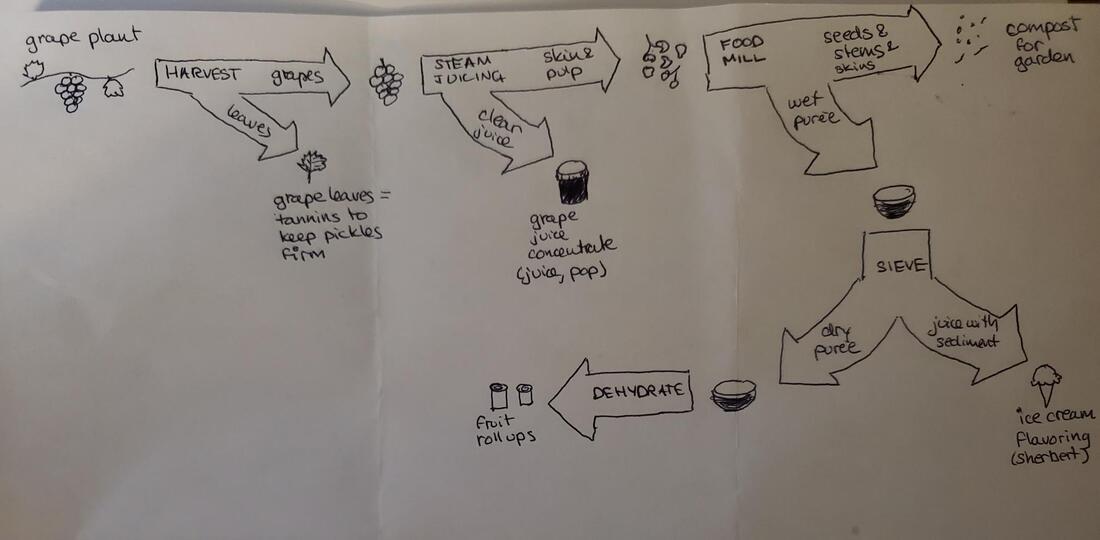 This is the tastiest kind of circular economy! Flip through to see some of the products we got from our delicious Concord grapes.  The first year I gardened, I quickly became overwhelmed by weeds. After a week away, it was hard to get back on top of things. I had read about the importance of mulching, but all that came to mind at the time was expensive bags of mulch at the nursery. I knew the cost would add up quickly based on the size of my garden and needing to add mulch over and over again. However, it was clear that I needed a solution. Starting the next year, and for many years since then, I have been using landscape fabric to control weeds. I lay it down along the rows, over my drip irrigation lines. I secure it with a generous amount of ground staples, rocks, and logs. Advantages of this method include:
I think this is a very decent approach to weed control and I definitely would never go back to not having any kind of mulch. However, I did find that this approach had some downsides:
Over the last couple of years, I have been experimenting with switching over my landscape fabric to natural mulch. I haven't given in to buying commercial mulch - I use whatever I can get my hands on for free. For example:
When mulching with natural materials, I make a pretty thick layer - about 4-6 inches. I keep an eye on it as it decomposes and replenish the low spots every time I mow the lawn or whenever it's needed. Weeds do pop up here and there but they are typically easy to pull. The mulch continuously decomposes, so it keeps enriching the soil. In the fall we put an extra generous layer of mulch that stays there through the winter. It keeps weeds down in the spring and I just pull off the extra when I plant, ready to be used as replenishment as needed. I still have fabric mulch in my main kitchen garden, but I don't use it in any new gardens and I am replacing it with natural mulch as it degrades. This is all part of the "no till / no dig" approach to gardening that I have been transitioning to. This biodegradable mulch composts in place and is making my soil better and better. The book that started me down this path is "Le jardin vivrier" by Marie Thévard. I also recently picked up "No-dig gardening" by Bella Linde and Lena Granefelt and "Building soil" by Elizabeth Murphy to learn more about the topic. One final tip. Years ago Ray decided to use some leftover construction paper as mulch. Not a good idea. It's waterproof so it doesn't let rain in, so you need to water a lot. And, now, 5 years into it, It's starting to fray in places and little bits of it are flaking off, I am afraid it may mix into the ground so we'll have to remove it. So be careful about using things such as this or tarps. Make sure whatever you use is biodegradable.  For me, composting is mostly a sustainable and convenient way to dispose of food scraps. Sure, it's good fertilizer but the amount of compost we generate doesn't put a dent into what we'd need to fertilize the gardens. When I need a lot of compost, our neighbor drops off a tractor bucket or composted manure, or I order some. When we first moved here, I started a compost bin outside. It was okay but a bit of a hassle to walk out and dump scraps, and we often procrastinated (especially in the wintertime) and ended up with a slimy bucket of scraps on the counter or even worse, fruit flies. Ever since I switched to vermicomposting (worm composting), those worries are over. I keep my worm bin next to the kitchen so it's easy to throw food scraps in as we go. To start vermicomposting, you need worms (you can order them online) and a worm farm or bin. There are many specialty bins available online, but, I'd rather make my own. I used two identical rubbermaid bins, one nested into the other. I drilled many, many holes in the inner bin, so that any excess liquid would drain out into the outer bin. Once my worms arrived, I put them in the inner bin along with some moistened bedding. I used coco coir (ordered at the same time as my worms) but there are many options. Once the compost is underway, I always keep about 3-6 inches of dry, shredded newspaper on top. I used to shred the paper by hand but I now use a paper shredder. This helps created a dark but airy environment for the worms, control humidity, and prevent fruit flies. The worms also gradually munch on it. Whenever I have food scraps, I lift up the shredded newspaper and add the food scraps in between the compost and the newspaper shreds. I don't have a lid on my bin. At first I did, but the lid made the bin too humid. The walls of the bins were covered in water and that made it very appealing for the worms to crawl up the sides and escape from the bin at night (they don't like light, so they don't escape during the daytime). Once outside the bin they would dry up and die. Not good! Once I stopped putting a lid on it, problem solved. The newspaper keeps it dark enough for them to be happy in the compost. There are many theories online about keeping the newspaper moist, but, I find that the lowest layer of newspaper gets moist just from absorbing moisture from the food scraps and compost. The top stays dry and the worms stay away from it. Once in a while, I throw in some eggshells grinded up in my food processor or mortar and pestle. The worms apparently need to eat this "grit" to help them grind up the food they eat. It's important not to overwhelm the bin with food scraps - the worms can only process so much. The worm population will adapt to the quantity of food you generate. However, in my case, when it's time to put up a lot of food (canning season), I have too much waste all of a sudden - in that case I put all the excess in my outdoor compost bin. But the rest of the year, the worm bin in sufficient. Every 1-2 years I harvest the compost. I have not found an easy way to do this. I used my 3D printer to print 3 sieves with holes of various sizes, that I designed to mimic the fabric screens people buy to make sieves. That allowed me to catch all the unprocessed bits of food (which I returned to the bin). But ultimately, I also need to do some hand separation of the worms and the compost. Since they run away from light, it's possible to scoop up the top layer of compost which will be worm less. By the time you put that layer into a bucket, the worms will have gone deeper and you can repeat that process. The worms need very little attention. Just topping up the shredded newspaper when it gets low. When we leave on vacation for a few weeks they don't need any special attention (don't overfeed them just before leaving - that's a recipe for fruit flies! Just give them the normal amount of food. They will keep busy processing leftover scraps and newspaper until you return. 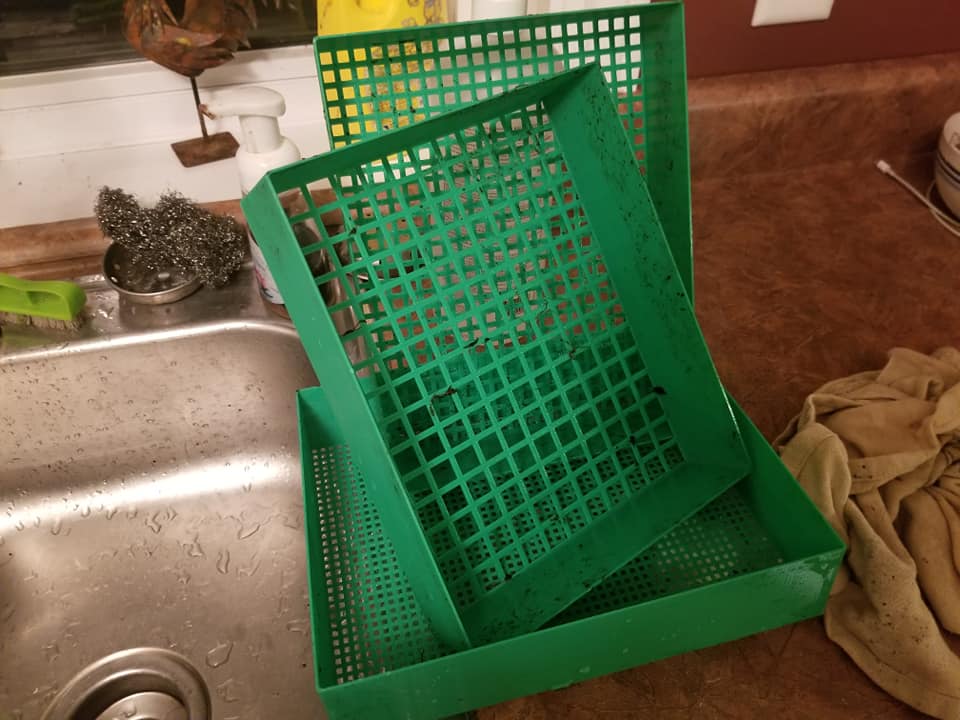 The 3D printed sieves I designed and printed |
About this blogThis is where I share my learnings and adventures in homesteading Archives
May 2024
Categories
All
|
 RSS Feed
